Showing posts with label sewing. Show all posts

Tuesday, January 11, 2011

Quiet Time Books (OR Mommy-gets-some-sleep-while-driving-16hrs Books)

 (May take a while to load - is pretty photo intensive)

I cannot take credit for these awesome books.

I mean... I made them. But I didn't originate the idea or even the individual designs.

I found each page from different places all over the web and the full credit goes to those creative moms (and MY THANKS for the sleep I got while driving from Virginia to Arkansas for CHRISTmas).


You'll need:
Felt in multiple colors
Fat Quarter
Velcro
Buttons, shoelace, yarn, embroidery thread...
Hot glue gun


Cover

For the cover, I used fat quarters (on sale for $0.99 at Joann's). Fold it in half lengthwise, right sides together. Sew all the way around, leaving a small opening for turning. Trim corners, turn and slip stitch opening closed.

Slip Stitch Illustration

I was in a hurry when I was doing the covers (the night before our trip, as usual) so the velcro got hot glued on. I would recommend white velcro, but I had already overspent my Joann's budget so I used what I had. : ) Thank the Lord for husbands who budget. I also hot glued the cover to the binding so the girls wouldn't keep "misplacing" it.


Pages

Each page was one sheet of felt - I put a thin line of hot glue around all the edges and folded it in half to seal. 

Book for 2 yr Old

   Stick people (holder hot-glued) 
Can you tell we're Rapunzel fans?

Color Matching (yes, that's supposed to be a palette)

Notebook Coloring page
(has a strap of felt wrapped around notebook, glued to page)
Baby hand not included.

Town with Car Garage

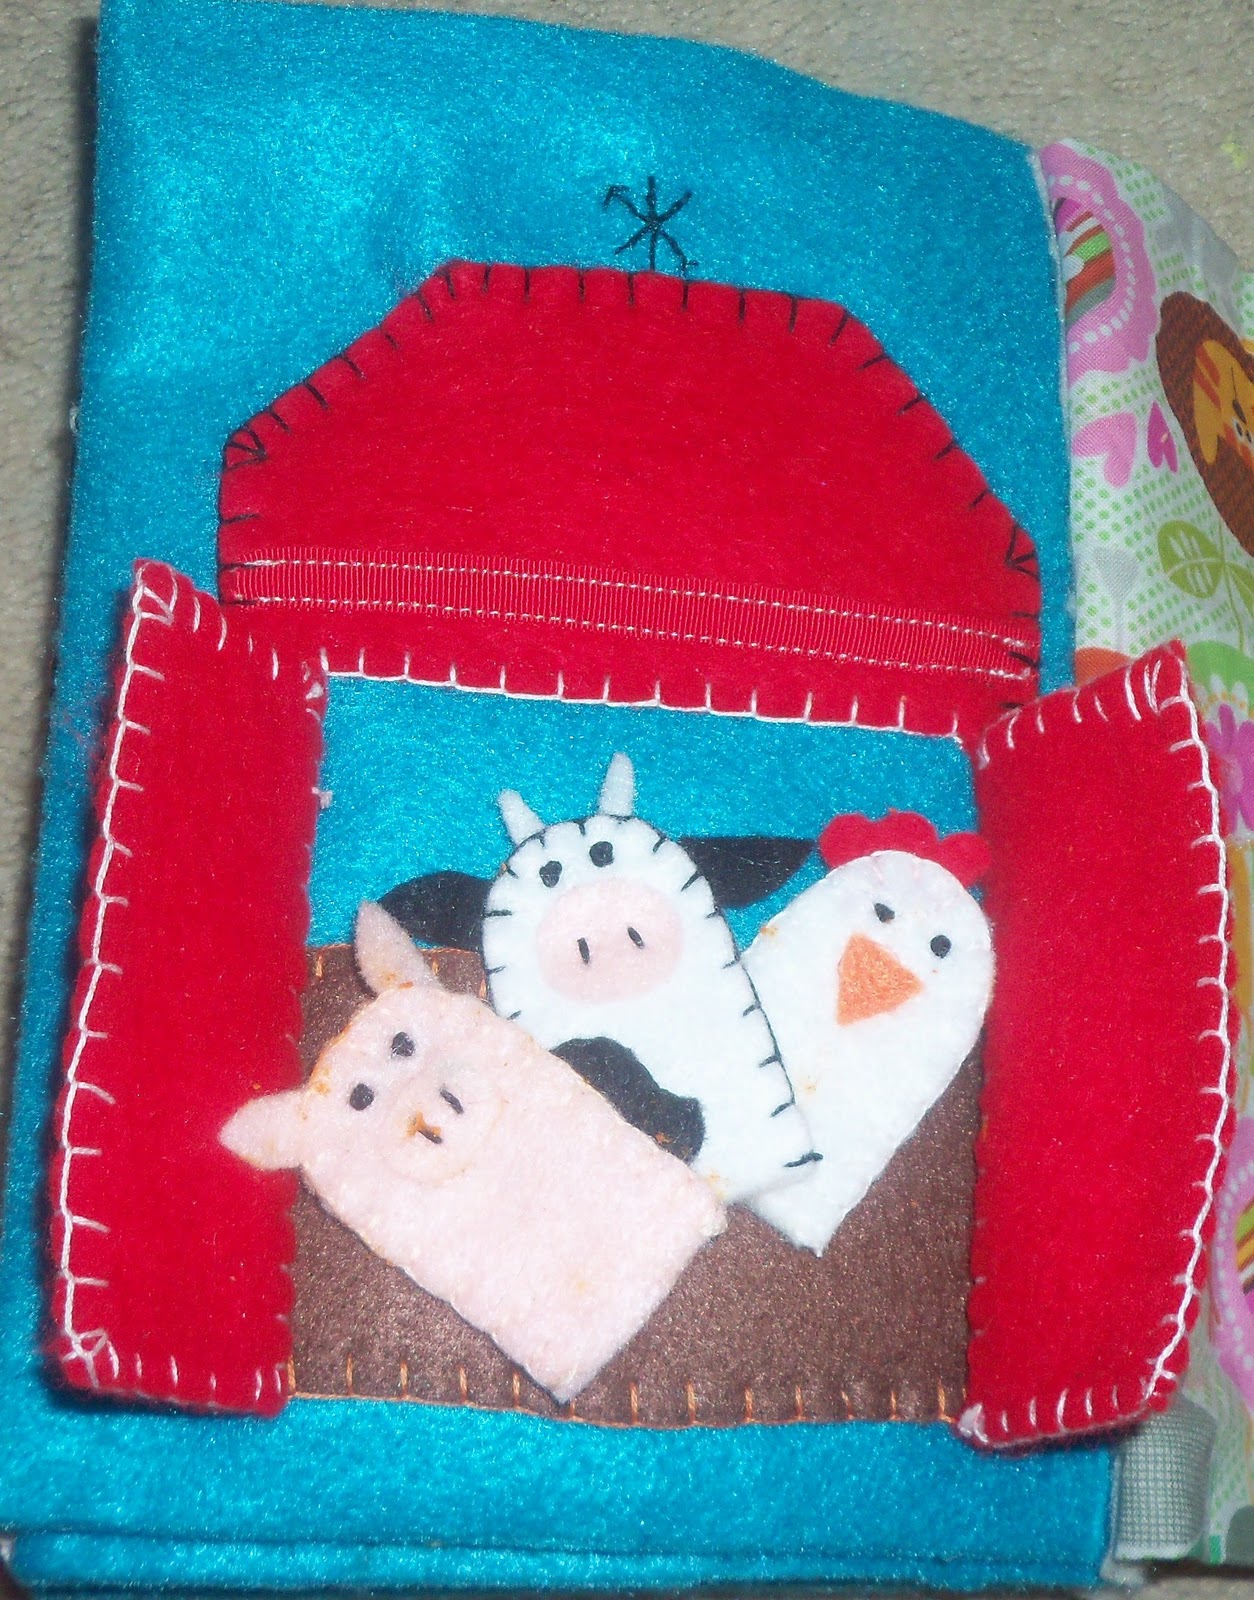
 Barn with Animal Finger Puppets
(was all sewn with a blanket stitch and took FOREVER)


Book for 4 yr Old 

More Stick People

Picnic (velcros on) - the only one I haven't finished - still needs a fork, knife and cup
 
Funny Face Man (already missing some eyes)
velcros on

 Kitchen with Counting Cupcakes

Coloring

Numbers

Purse with Goodies 
(fastens with button, blanket-stitched)


Book for 6 yr Old

Weaving

Tying Shoelaces and Buttoning Flowers

Girl with Dress-up Clothes - just don't look at her face... or hair.
(has several more outfits... somewhere)

More Stick People
(LOVE the colors and eyes Evie did)

Heart Tic-Tac-Toe

 Coloring Page

Girl with Yarn Hair
(in hindsight, should have done full-face girl with hair that could be braided)

Binding

For the binding, I stacked all of the pages together [with all additions (notebook, crayons, car...) inside] and measured for width of binding. I cut this out from a scrap piece of felt. Then I put a line of hot glue down the inside seam of the pages and added them one-by-one to the binding, starting at the very edge. I had a bit of extra binding on one of the books but I just trimmed it off. 


This was one of the most FUN projects I've done and it just didn't get boring because I was always doing something different.


handmade projects

Wednesday, October 20, 2010

SUPER Easy Braided T-Shirt Headband

So easy that you don't need a single crafty bone to do this.

First, cut a 1/2"x 12" (or longer, depending on length wanted) strip from three different tees. I keep old t-shirts that get holes in them to use just for these types of crafts. You can pin them to something or tape them to your desk like I did  : )


Start braiding! Mine didn't want to curl so much so I was using a pin to hold them in place while I was folding the edges back.

Once you've braided to the end, pin in place and trim off the excess. You can either hot glue the ends together or sew a line across them. I did a little hand-stitching... but I'm crazy like that.


I then did a fitting and measured out how much elastic I would need to finish it. Use a little less than what you think you'll need - the headband will stretch, trust me.


Place the elastic about 1/2 an inch onto the braid and wrap a folded piece of coordinating fabric around it. Again, either sew in place or hot glue. Do this for both sides of the braid.

Done. See how easy that was?

Now admire your handiwork on your daughter...


And let your other daughter try it on because she has to do everything the older ones do : )

Tuesday, October 5, 2010

Girl's Drop Waist Dress

You know those awesome $3 kid's clothes at Wal-mart? I was browsing through them the other day and saw some potential for clothes going out of season... and my daydreaming resulted in a cute little drop-waist dress for my daughter.


1 t-shirt, one size too big
1 skirt, two sizes too big (or waist size matching shirt girth)
ribbon
embellishments

First, I cut off the elastic from the perfectly good skirt...


Then I took the shirt and folded it inside out.


Leaving the skirt right-side out, place it inside the (inside out) shirt and align the ends. Pin in place.


Here's an inside look of what's going on. My husband says I confuse people by waving my hands around... hopefully that doesn't translate to blog.


Sew a zig zag along the seam. I went back and sewed straight down one side of the zig zag, but that's not absolutely necessary.


Trim the excess, turn the dress right-side out and sew some coordinating ribbon on. Mine only coordinates a little... but I'm okay with that. I also made a fabric flower out of some scrap fabric but a bow made out of the ribbon would have looked good too. 


Put it on your daughter and it will look even cuter. : )

Tuesday, July 6, 2010

Sewing a Dora Backpack

I just finished making a Dora backpack for my two year old's birthday and I just have to share!

I looked forever to find one and they don't make soft ones (!) so I tried to find a tutorial and couldn't find one of those either (!)... so I just made it up as I went. That's usually how things go around here. : )

I started by free-handing a pattern on wax paper


Then I cut out the material - four of the pattern above (two in purple and two in the liner material) and one long strip to go in the middle (+ one in the liner material). I also cut out the straps - mine was about four inches wide to have room for folding over so they would be sturdy. The length of the strap will vary by child.


Here's the liner:

Next I sewed the two sides and the middle together, right sides facing. With the liner it's wrong sides facing. Make sure to sew the straps and put them in before sewing the body together. Then I cut out the face pieces from random scraps of fabric - using buttons for the eyes - and sewed them all on with a zig zag stitch. (I'm better at straight lines, so it aint that purty)


Then I put the liner in (right side up), made a small cut on each corner of the backpack, turned down the top of the backpack onto it (folded in once) and sewed all the way around in two lines. The straps may make this thick, depending on fabric, so make sure you're using the right needle... (OPTIONAL: cut a small piece of cardboard to fit in the bottom to stabilize it)

Lastly, I measured the top opening to get the flap dimensions, free-handed the pattern again, cut it out in purple and liner, folded over the purple, sewed, and attached to the backpack.

Voila! (No, it's not ironed - don't judge - I was in a hurry!)


Related Posts with Thumbnails